Showing posts with label Recipes. Show all posts

Saw it. Pinned It. Did it. - Crock Pot Creamy Italian Chicken

Wednesday, February 20, 2013


I haven't been home in time for dinner since...ummm...busy season started on February 1st. I announced to Chris that until April 15th, I will not - I repeat: I will not - be cooking dinner. 

Does putting something in the crock pot in the morning and having it be ready for dinner count as making dinner? If it does then I am super woman. Tax accountant, graduate student, and a wife that has a hot meal ready when the hubs gets home. Bada-bing-bada-boom!

So maybe I cheated a little bit by "cooking" dinner in a crock pot, but there we no complaints when this delicious meal graced the taste buds on our tongues. Yum, freakin' yum.

I pinned this recipe months ago, years ago, crap I don't know when I pinned it, but I knew that I had to try it.

via
Y'all, for real, it is SO simple.

Here is what you need:

4-6 boneless, skinless chicken breasts
1 packet Good Seasons Italian dressing mix
2 (10 ounce) cans cream of chicken soup
1 (8 ounce) block of cream cheese, cut into cubes
Egg Noodles or Rice, to serve with

**I used 1 can of cream of chicken coup and 1 can of cream of mushroom soup**

Here are the directions from the original source:

Directions: Spray crock pot with non-stick spray (I forgot this step and it was fine). Place the chicken breasts in crock pot, and sprinkle the Italian dressing mix over the tops. Pour the cream of chicken soups over chicken, and then spread the cubes of cream cheese evenly over all. 

Cover and cook on low for 6 hours (I cooked mine for about 5 hours on low. Just check it around 4.5 hours. You don't want your chicken to get too dry). Remove lid and stir mixture together. Cut chicken into bite-size pieces. (If the sauce seems too thick, you can thin it out with a little milk)

Serve chicken and sauce over cooked egg noodles or rice. Enjoy!

This recipe is a gem. "Shine bright like a diamond..." as in this recipe is a keeper. And a repeater. And husband approved. And super-busy wife approved.

Now, back to homework and taxes I go!

So happy to be linking up with Stephanie and Katie!
Photobucket

Sarah's Homemade Peanut Butter Balls

Wednesday, December 12, 2012

Is your mouth watering yet? Because mine is.

Growing up I participated in 4-H. Does anyone know what the "H" I am talking about?! I honestly can't tell you what the H means, or what the actual purpose of this thing/group/organization is/was (and I am too lazy to google it), but all I know is that I was involved in the recipe portion of the contest...and these balls took home first place. Yay, baby! My peanut butter balls brought home the bacon, as in a cash prize.

After I got over my sudden gush of success as an eight year old (I mean these balls were being requested left and right. Can't an eight year old just sit back and sip on her Kool-aid?!), I realized that these treats are in fact the bomb.com and there is a reason I won that cheap blue ribbon.

Every holiday party I ever went to I signup up to bring these babies. Deliciousness dipped in choclate...quite like Denzel. Mmmm. Anyways, over the years I have perfected this recipe and I am happy to share it with y'all for the Larson Lingo Cookie and Treat Recipe exchange.

The only good that can come out of this link party is that I will be consuming my weight in sugar and butter just in time to burn it all off for my race this weekend.

Without further adeiu, here is my famous, 4-H winning recipe for Sarah's Peanut Butter Balls.

1 1/2 cups of powdered sugar
2 cups of crunchy peanut butter
6 tablespoons of butter
1 teaspoon of vanilla
1 package of chocolate almond bark

Melt butter. Mix first four ingredients in a bowl until well blended. Place in refridgerator to chill.
 Break (bang on a wall, cut with an electric saw, etc) the almond bark in "half". I say "half" because it really just breaks wherever you want it to break. If you even manage to break it, you're already doing better than me. that sucker should be called an almond brick!

Place one "half" in microwave safe bowl. Heat according to instructions.

Pull "dough" out of fridge and make round balls with hands. You can make the balls before you put the mixture in the fridge, but then they get veryyy sticky because the dough is so warm. It is best to make the balls with chilled dough.

Once you have the dough balls formed it is time to coat them in your chocolate almond bark. 

I just drop mine in. Cover it with chocolate, and scoop it out. Place on wax paper covered baking sheet.

Once all peanut butter balls are covered, place in refrigerator until ready to eat!

Enjoy!


Did I meantion we get a little help with the cleanup, 'round here? They can't just live here for free :)


I know, I know...we are developing bad habits with our children. Luckily all the bad habits will be gone less when we decide to have human babies! And those puppy-dog eyes are no joke! By the way, Bailey is only licking the cheese from Chris's mac-n-cheese. So no, Prince Wrigley and Princess Bailey do not get a plate full of homemade food...only half ;) Totallyyy kidding.


When I asked Chris to take a picture of me, these were his exact words, "Ummm, but babe, you aren't exactly dressed appropriately for the blog..." (then picture his face like "I am telling you this for your own good.") Thank you for pointing that out Mr. Obvious. He spared y'all the image of my super-hot sweat pants I am wearing from junior high track. Just keepin' it real here at Tucker Up, just keepin' it real.


Have you ever made these? A version of these? You could do so much with the recipe!!

Have a happy day, y'all!

**If you are going to Pin this recipe, please link it back to this post :) Much appreciation in advance!

 
Holiday
 
Photobucket

Pinterest Told Me To Cook It

Monday, November 12, 2012


I have been on a Pinterest Told Me To kick because of Sheaffer's blog and I have realized that with Pinterest making my outfit and meal decisions, life is so much easier! Seriously, I wake up in the mornings, look at outfits I have pinned, go to my closet, and get dressed. Then for dinner I pull up my Pinterest and decide on a meal. Simple as that.

I pinned this chicken recipe a long time ago and finally decided to make it. Well when you click on the source it takes you to an unavailable site. Whomp whomp. Determined that not be a roadblock, I looked at the picture and made my own version. Here is my recipe:

Pinned Image
Picture on Pinterest

- 1 package of boneless, skinless chicken breast
- butter
- seasoning
- 2 packages of string cheese
- 1 egg
- 1/4 cup of milk
-Breadcrumbs

Call me crazy, but doesn't that picture look like they are rolling string cheese in chicken?! So that is exactly what I did...if anyone has the original recipe pa-leaseee let me know!

I started by tenderizing my chicken by pounding pretty thin. Then I spread a very thin layer of butter on top of the chicken in order to help the seasoning stick. I used salt, pepper, garlic salt, and other random seasonings. After that I cut my string cheese in half and placed one half on each chicken breast and rolled it up, just like the picture. I secured it with toothpicks.


Once they were rolled up, I dipped them in my egg and milk mixture. I placed them in a baking dish and coated them with breadcrumbs.


After all sides were coated, I baked them for about 20 minutes at 350 degrees.


They were so good! Chris was so impressed with my "stuffed chicken." He didn't even realize how easy it was, or that it was stuffed with string cheese!

Have you ever made a delicious recipe from Pinterest? Have you ever made THIS recipe from Pinterest?! I'd love to have the original recipe!


Oreo - And Brownie! - Dirt Cake

Monday, October 29, 2012


I mentioned here that we had our 1st Annual Tucker Halloween Party! Since I was bound and determined to consume an absurd amount of sugar, I decided to make an Oreo Dirt Cake. When it was all said and done it somehow ended up with brownie in it as well. Oops! I might be addicted to delicious food.

Here is what I used:

- 1 package of Oreos
- One pan of brownies
- 8oz. of softened cream cheese
- 3 cups of milk
- 1 tsp of vanilla
- 16oz. of Cool Whip (yum!)
- 1 cup of powered sugar
- 2 packages of instant vanilla pudding

This dirty little recipe (haha, I crack myself up) got started by crushing all the Oreos (and eating a few here and there). When I had them good and beat to death crushed, I began on my Cool Whip concoction. Mix the cream cheese, Cool Whip, and powdered sugar together until blended (Side note: I may have "tested" each step of this process to ensure the finest flavors were being made). Once my Cool Whip fluff-stuff was blended, I mixed the milk, vanilla, and instant pudding in a separate bowl. Let that mixture firm up a bit and form a puddin' like texture. Once again, try to mixture to make sure it isn't poison :)


Here is where I would change what I did. I didn't mix the pudding and Cool Whip mixture, and instead layered them. Next time I will blend them together. Less steps and still (I am assuming) the same to-die-for taste.

And now is where the extra calories ingredient got added in. I took a look at all the prepped items and was afraid there would not be enough to fill my bowl/feed everyone, so I decided to bake a pan of brownies and mix the crushed Oreos in with the fudge brownies. Are you drooling yet? Because at this point in the cake-making-process I had consumed my weight in sugar and had not eaten a balanced meal since lunch. YOLO. Whoop!

Crushed Oreos and brownies. How good would this be with ice cream?!?!
Once you have everything prepped - crushed Oreos/brownie, Cool Whip fluff-stuff, and pudding - it is time to start layering. I put mine in one of my favorite bowls my Mom gave me. It is glass so people can see the scrumptious layers, but any large bowl would work. Start with layering the bottom with the crushed Oreos and brownies, then the Cool whip fluff, then pudding, then Oreos/brownies. Repeat until you have a) licked the bowls clean, or b) run out of room in your bowl.


I made mine Friday night (Such an exciting couple Chris and I are. We bake and go to bed at 9:00pm on Fridays. We are that cool.) so it could chill overnight.

It was so freaking good. That is the only way to describe it. And it was a total hit at the party. I will be making this again!

Have you made any delicious/spooky Halloween treats?!?

Easy Chicken Parmesan

Monday, October 22, 2012


Anyone who knows Chris knows he loves Italian food. That boy could eat noodles every. single. day. Seriously, it is crazy how much he loves spaghetti and meatballs. Because he loves Italian so much, I have to switch it up every now and then. In comes Chicken Parmesan to the rescue. Now don't get me wrong, I love Italian food as well, but all those noodles don't fall into my "trying to eat healthy" category.

Here is my super delicious and easy Chicken Parm recipe.
  • 1 pkg of boneless, skinless chicken breasts
  • 1 pkg of spaghetti noodles
  • seasoned breadcrumbs
  • 2 eggs
  • about 1/2 cup of milk
  • olive oil
  • spaghetti sauce
  • shredded mozzarella cheese
  • shredded Parmesan cheese
  1. Preheat oven to 350.
  2. Start a pot of water to boil noodles.
  3. Lay chicken breasts out on heavy duty foil. Tenderize chicken with a hammer meat tenderizer. I pound mine pretty thin.
  4. In one bowl, whisk together milk and eggs. In another bowl mix together seasoned breadcrumbs.
  5. In a skillet heat "some" oil. Depending on how big your pan is, you only want a thin layer of olive oil.
  6. Once the oil is hot, dip raw chicken in egg mixture then into the breadcrumbs. Make sure chicken is coated well and then place in hot oil. I usually cook them on each side for about 3 minutes.
  7. Once the chicken is pan fried, place chicken in a baking dish.
  8. After all the chicken is done frying and placed in the baking dish, cover the chicken with a layer of mozzarella cheese, then with a layer of spaghetti sauce.
  9. Check to make sure the chicken is covered in spaghetti sauce then add one more layer of mozzarella and a thin layer of Parmesan cheese.
  10. Bake in oven about 25 minutes.
  11. Place chicken over noodles and enjoy!


Texas Caviar Dip

Monday, September 24, 2012


Chris mixes it with his hands, he isn't really that messy. Ok, sometimes he is that messy.
This is the most delicious dip on the planet. Or at least in Texas. And it is healthy...if you don't eat it with chips, but who does that?!? Umm, no one!

Thanks, Mrs. Leann, for the recipe! We make this dip on a monthly basis. Yum!

  • 2 cans of Rotel, drain
  • 1 can of black beans, drain
  • 1 can of field peas with snaps, drain
  • 1 bell pepper
  • 1 yellow pepper
  • 1 red pepper
  • 1 small red onion
  • 2-5 jalapenos, depending on how hot you want it
  • 2-3 avacados
  • 3T garlic
  • 3/4 bottle of Zesty Italian dressing
Chop all of the ingredients up. Add in the drained cans of Rotel, beans, and peas. I say 3/4 bottle of dressing, but really I just make a couple giant squigglies over the top of the bowl until I think it is enough. Stir it all up and refridgerate. Or eat right then, then refridgerate. It is so much better the day after it sits, but it is still delicious right away.By the way, it makes tonsss...so this would be great to bring to a party! Chris and I eat on it for about a week!

Blurry because we were in such a rush to eat it!

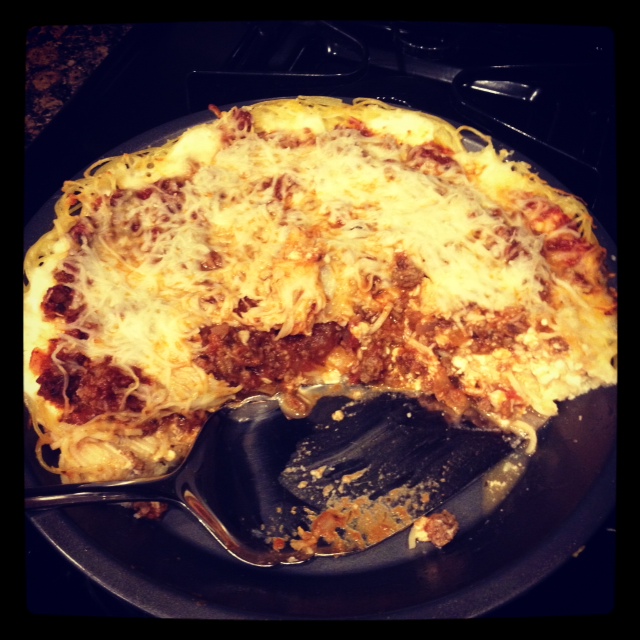
Spaghetti Pie

Wednesday, September 19, 2012


Who doesn't love spaghetti and who doesn't love pie? Why not combine the two!

What you need:
  • 4oz. dried spaghetti
  • 1 Tbsp butter
  • 1 egg, beaten
  • 1/4 cup grated Parmesan cheese
  • 8oz. ground beef (we used deer!)
  • 3/4 chopped onion*
  • 1 clove garlic, minced*
  • 1 8oz. can of tomato sauce*
  • 1 tsp dried oregano*
  • 1 cup low-fat cottage cheese
  • 1/2+ cup shredded mozzarella cheese
*This is if you want to make your own spaghetti sauce. If you like the easy route like me then you can just add about 8oz. of spaghetti sauce to your browned meat (this is the way to go!). We used Prego 'Fresh Mushroom', but you can use whatever you'd like.
  1. Preheat oven to 350. Cook spaghetti according to package. Drain. Return spaghetti to warm saucepan. Stir in butter until melted, then add egg and Parmesan cheese.
  2. Meanwhile, brown meat. Add spaghetti sauce, or go the difficult route and add all the * items :)
  3. Coat a 9-inch pie plate with nonstick cooking spray. Press spaghetti/egg/cheese mixture onto the bottom and sides of the pie plate. You are making a spaghetti crust.
  4. Spread cottage cheese on the bottom and sides of the pasta crust.
  5. Spread meat and sauce mixture over the cottage cheese (I promise you cannot taste the cottage cheese for those of you cringing right now...I hate cottage cheese, but love this recipe).
  6. Sprinkle with shredded mozzarella. 
  7. Bake for 20 to 25 minutes or until bubbly and heated through. Cut into wedges just like a pie, and enjoy!


*Recipe based off of Better Homes and Gardens "Our Best Recipes"

Delicious Guacamole

Monday, August 13, 2012

The best guacamole you’ve ever had. And it’s super easy!
The recipe is based on an individual serving.
·         One avocado
·         One tablespoon scoop of Tostitos Mild Salsa
·         A good squeeze of lime juice
·         Salt, pepper, and garlic salt to taste
If you want to use two avocados, just add two scoops of salsa; three avocados, add three scoops of salsa; and so on. If you use Pace Picante sause instead of actual salsa, it will not taste near as good.
Chris and I will eat guacamole almost every weekend. It is a good healthy alternative to queso, or other dips. That is, until we add the half bag of chips that we eat! Oh well!
Enjoy!
Do you have a favorite guacamole recipe?!

Chris's Spaghetti and Meatballs

Friday, August 3, 2012


Chris loves spaghetti and meatballs. Not spaghetti and meatsauce, meatballs. And, he prefers Prego's Fresh Mushroom spaghetti sauce. Another fact: he makes the meatballs himself! And they are delicious. If they weren't, I would say so :)


Here is how Chris makes his delicious meatballs:
  • 1 pound of ground meat (we use deer or beef, but turkey and chicken work fine)
  • 1 egg
  • 1/2 onion, chopped
  • about a tablespoon of garlic power
  • fresh garlic, about 2-4 cloves, chopped
  • about 3/4 cup of breadcrumbs
  • random other seasonings (pepper, onion powder, etc)
He mixes all the ingredients together with his hands and forms meatballs, about the size of a golf ball.

In a frying pan, he heats about three tablespoons of olive oil. He places the meatballs in the frying pan. He, or I, rotate the meatballs around until a brown crust forms around the outside. They might look like they are burning...but hopefully they aren't!

Once brown on all sides, place the meatballs in sauce. Turn on medium heat and let meatballs cook in sauce for about 15 minutes. Enjoy!

There ya have it! Chris Tucker can cook!

Does your man have a recipe up his sleeve?!

Pork, Rice, and Gravy

Monday, July 30, 2012


Chris's Mom, Terry, and sister, Lauren, came over last Thursday to hangout and have dinner (His Dad was in Colorado, so he missed out!). Chris and I have been loving our Crock-Pot that we got for our wedding (Thank you Tony and Leann!). For this occasion I decided to throw together a pork, rice, and gravy concoction. I based it off of this recipe.

Here is the recipe I used:
  • 1 package of boneless pork, country style ribs
  • 1 package of onion soup mix
  • 1 package of brown gravy mix
  • 1 onion, chopped
  • 1 1/2 cups of beef broth
  • 1 can of cream of chicken soup
Place the pork at the bottom of the Crock-Pot. Mix all the other ingredients in a bowl and pour over the pork. Cook on low for 6 1/2 hours.

I served it over rice and it was to die for.

Chris's family has their own secret recipe for pork, rice, and gravy, so I was nervous about their reaction. They loved it! His mom even wanted the recipe!

Do you make pork, rice, and gravy? What is your recipe?!

Meatloaf and a Toad

Wednesday, July 25, 2012

Growing up my Mom always encouraged me to help her cook so that one day I would be able to cook for my family. I think she secretly knew that I'd marry a man who loved to eat! She made home cooked meals almost every night and I enjoyed cooking with her. One of my favorites growing up (it gets a bad rep, but it's sooo good!) is meatloaf. To me it is like a giant hamburger without the bun, and more flavorful!

Meatloaf right before it went in the oven!
Here is my Mom's meatloaf recipe:

Preheat oven to 350. Cook for 45 minutes.
  • 1 pound of lean ground beef
  • Half an onion, chopped
  • 1 tbs of Worcestershire sauce
  • 1 1/2 cup of oats
  • 3/4 cup of ketchup
  • 1 egg
  • garlic salt
  • pepper
  • seasoning salt
  • any other seasoning you want!
Usually I use more onion, more or less oats, more or less ketchup, and I always guess on the seasoning. Just remember to not make it too salty!

Mix all the ingredients together with your hands...yes I said with your hands! Squish and squash the meat together until everything is thoroughly blended.

I use a cast iron skillet, but a regular Pyrex baking dish would work. Form a "meat-loaf" in the pan.

My Mom always made a "canal" with the side of her hand down the middle of the "loaf." Then she drizzled ketchup all over the top.

Put it in the oven and you've got one delicious meal coming right up!

Chris and I had this dish last night with home style mac and cheese and veggies. Being that there is only two of us, we will be having left overs tonight!

After we ate Chris went outside to give the pups food and water. He came back inside with this:


I found a smaller one the day before when I was outside watering the flowers.

Just adorable little creatures.

So you have a great meatloaf recipe? Seen any cute toads lately?!

Happy Wednesday!