DIY Starburst Mirror - Under $5!

Sunday, September 30, 2012


Has anyone else been eyeing a starburst mirror? Like this one, or this one, or this one?? I love almost every starburst mirror I lay eyes on, but I don't love the prices. That's what got me thinking (and googling!) about how to make a starbusrt mirror on a budget.

After some research, I decided on a game plan and went for it!

Materials:

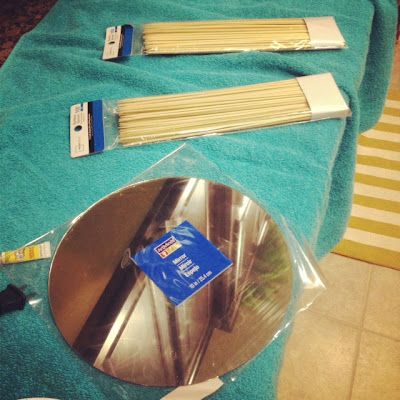
- 10' round mirror from Michael's/Hobby Lobby
- 2 packages of wooden skewers (100ct each)
- Glue gun and LOTS of glue sticks
- This template

First, start out by cutting out the template and super gluing it on the back of the mirror.


Count out 16 skewers and mark them 1' from the tip. Some of the skewers may not be straight, so just eyeball it...if it look crooked, throw it aside and get a new one! There are plenty of skewers!


Once you have the 16 skewers marked, line the black mark up with the line/edge of the template and start gluin'! By the way, the template will not cover the entire mirror. Just center it on the mirror and glue it down. You can see on the picture below that the template does not reach the edges. Don't be afraid of using the glue gun! Mine was covered in hot glue! 


The discoloration you see on the template is from my super glue...


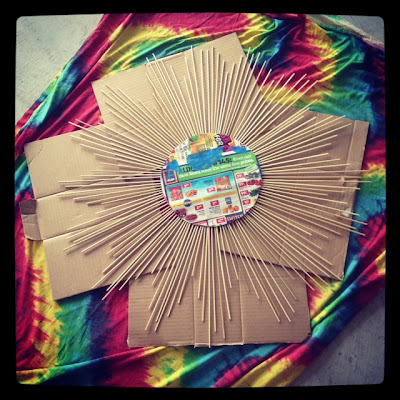
Once you have the 16 skewers glued down, it is time to fill it in! Depending on what type of starburst you want depends on the pattern you will follow.

I went with seven skewers in between each skewer that was already glued down. I laid the seven skewers down in a 'V'-like pattern of: short skewer in the middle, then the two on either side were a little longer...and I went from there...it is honestly however you like it!


See below how there is one short skewer in the middle, then it goes up on either side? You may have to cut some of the skewers in order to cram them all in a section.


And of course my trusty sidekick was there for moral support. Yes, I had just vacuumed that rug. 


When I said you will use a lot of glue, I meant you will use a lottttt of glue.


After I finished gluing all my skewers on I let it sit over night. In the morning I took it into the garage to get a fresh coat of silver spray paint! I covered the mirror with newspaper.


Ta-daaa! And there she hangs! (Oh, and is that a new headboard, you ask? Hmmm, I DIY'd that this weekend as well! Details on the headboard later this week!)


Isn't she lovely?!My husband was seriously impressed...as was I! Don't you "LOVE" that art? (More details on that as well..in a later post!)


So now for the budget breakdown. Hold onto your britches because it gets intense.

- Mirror $4.99 with a 40% off coupon: $3.00
- 2 packages of skewers at $.97 a piece: $1.94
- Already had the glue and glue gun
- GRAND TOTAL: $4.94

I know, you're amazed, right?!? Yah, me too! All day I have been in awe that I finally have a starburst mirror for under five bucks. Ahhh...I'm in love :)

This weekend I was on a DIY craze. This whole week will be full of projects that dominated me I dominated this weekend! "LOVE" art, nail head trim headboard, canvas art, and painting pumpkins! Oh, and did I mention it was all done on a major budget?! Stay tuned!

*Project inspiration from Under the Table Dreaming blog

Landscape Recognition, Whaaaa??

Wednesday, September 26, 2012


Chris takes pride in his our yard. That boy will eagerly mow the lawn any day of the week. Maybe because we grew up playing baseball and softball, but Chris has an obsession with mowing our yard in some sort of pattern. Well, let me tell you...it has not gone unnoticed!

Last week we received a letter in the mail from our HOA Landscape Committee thanking us for taking such pride in our yard. Woo hoo! Chris was completely bummed because he thought we got Yard of the Month (yes, we are lame because we get excited about potentially winning Yard of the Month), but it is nice to know that our hard work and green thumb mad watering skills are paying off.

In our flower beds we had been getting pesky Bermuda grass. It was creepin' in on my beautiful, dark mulch. When they built our house they left a bunch of extra bricks in our garage (in case we needed a replacement brick?), so Chris asked me if he could use the bricks to for a border around the flower beds to keep the grass out. Genius. I didn't want the bricks to be seen from the road, because eventually we would like get some rock laid to frame the flower beds, so my Mr. dug out the grass and laid the bricks so they wouldn't be seen.

He is so handy :)


My Distractions From Studying


I feel like everything > studying. I can clean the entire house, with a smile, instead of having to study. I will take a break from studying and end up doing a load of laundry. It is the weirdest thing. I am never more motivated to clean, cook, DIY, etc. then when I should be studying.

I will be done with graduate school in May and I. can't. wait. I am so over school, but I know it will be worth it in the end.

This is the scene most nights when I am trying to study after the Mr. has already laid his little head to rest:


Both of those little munchkins lay their heads on my lap in the sweetest way that seriously melts my heart every time. I feel like they are saying, "Mom, just please pay us some attention :(" even though they are not lacking in the attentioin department at all! I always end up straying from my homework to give those babies some lovin'. With faces like that, how could I resist?!

My Terrible Pictures

Tuesday, September 25, 2012


I'll admit. I am a bit embarrassed that ALL of my pictures are straight from Instagram. Sad, I know, but here is why.

1. Chris has had my digital camera at his work for months now.
2. We just don't own a good camera.
3. It is SO convenient to just whip your phone out and snap a picture.
4. I am hoping and praying that Santa brings me a new Canon camera.

I have been dropping hints ("Babe, can we invest in a good camera for Christmas?" and "I think my blog would look better if I had quality pictures. Don't you think that would be a great family investment?") left and right, so we will see come December.

I wish I could give y'all quality pictures, but Instagram will have to do, for now! Blah.

So, that is why this blog contains a butt load of terrible, always filtered, sometimes blurred, pictures. I am now going to go remind Santa what I want for Christmas :)

Garage Sale Finds

When Chris is in the garage-sale-mode, he is on the hunt for junk and stuff to clutter our house a bargain. Last weekend was the community wide garage sale in Lantana. Chris and I usually are selling our old stuff that Chris bought from the previous year's garage sale junk, so we never get to participate. This time we were selling nothing and were on the lookout (for nothing in particular).
At the spring garage sale we got a HUGE deep freeze that Chris insisted we get. It has made a very good storage shelve and saw horse, but it has yet to be used as an actual freezer. One day I am sure we will be able to fill it up! We also scored big with our Kitchenaid stainless steel refrigerator!
Here is what we found at this fall's garage sale:


I walked away with matching black vases and another item for $1 that I am secretly doing something with and will post about later! I also got 12 amber colored chargers for my fall table setting. Once I get it all set up I will show it to you!
Chris walked away with a bunch of baseball stuff. Not sure where it is going to go, but it was $5, so I let the boy get it :) He also LOVES those books and apparently he doesn't have those in his "library." He also hit a home run with some almost brand new golf shoes for 10 bucks! He said they are probably worth $60-80, so I was pleased with that purchase.

Together we got a 40 gallon tin trash can for $3. I have wanted one to put the dog food in because I HATE sticking my hand down in the bag...your whole arm comes out smelling like dog food. Gross. The guy wanted to get rid of the smaller 20 gallon can so bad that he threw that one in for free! Score!

Have you found any great garage sale deals?!

A Few Fall Touches


Last week I took a trip (across the street from my work) to Crate & Barrel; aka designer heaven. I was loaded down with gift cards and ready to shop. I was in search of fall items...and a fall place setting.

I walked out with an adorable yell/gold striped rug, fall dish towels, linen napkins, napkin rings, and a table runner. My table is far from finished, but we are off to a good start!

Crate & Barrel has the cutest dish towels! Yes, I love dish towels. They add color to a kitchen and can be switched out with the seasons. It's the little things that get me :)


We already had all the dishes. The grey dishes are from Crate & Barrel (wedding gift, thanks Sarah and Kate!) and the yellow/gold chargers are from a garage sale. The orange dishes are from my college days. I got them at Ross. I like the simple table runner because it can be used for more than fall.

Hopefully this weekend I can DIY some sort of centerpiece...I am thinking golden pumpkins, or maybe chevron ones!

Texas Caviar Dip

Monday, September 24, 2012


Chris mixes it with his hands, he isn't really that messy. Ok, sometimes he is that messy.
This is the most delicious dip on the planet. Or at least in Texas. And it is healthy...if you don't eat it with chips, but who does that?!? Umm, no one!

Thanks, Mrs. Leann, for the recipe! We make this dip on a monthly basis. Yum!

  • 2 cans of Rotel, drain
  • 1 can of black beans, drain
  • 1 can of field peas with snaps, drain
  • 1 bell pepper
  • 1 yellow pepper
  • 1 red pepper
  • 1 small red onion
  • 2-5 jalapenos, depending on how hot you want it
  • 2-3 avacados
  • 3T garlic
  • 3/4 bottle of Zesty Italian dressing
Chop all of the ingredients up. Add in the drained cans of Rotel, beans, and peas. I say 3/4 bottle of dressing, but really I just make a couple giant squigglies over the top of the bowl until I think it is enough. Stir it all up and refridgerate. Or eat right then, then refridgerate. It is so much better the day after it sits, but it is still delicious right away.By the way, it makes tonsss...so this would be great to bring to a party! Chris and I eat on it for about a week!

Blurry because we were in such a rush to eat it!

Pillow Fight

Sunday, September 23, 2012


It has been a constant fight to find throw pillows that don't blow the budget. Seriously, why is a pillow that you are NEVER going to use (or maybe you do!) have to be so expensive?! We had one pillow on our couch and it had a price tag on it of $39.99...Chris almost died! After I explained to him that mom Mom gave it to us, and she paid a couple bucks for it at a garage sale, he calmed down.

But seriously? Forty bucks for a throw pillow. I don't sew (I'd love to learn!), so there is no way I am making my own pillows.

Finally, I stumbled across some for $9.99....andddd guess what???? They weren't ugly! Woo hoo! I found them at Anna's Linens in McKinney. Usually the ones on sale for $10 or less are plain and boring, but these were actually cute! Four of them happened to hop into my arms and come home with me :)

Lucky for me, Ross was right next door, so I popped in there and found another cute pillow for $11. It must have been my lucky day!

I never knew pillows would give me such joy until I owned a home. Ahhh...it instantly makes it feel homier :)


See the pillows on the ends? How they have the 'V'? That is what needs to be happening with all the other pillows, but they are cheap stuffed with cotton, instead of feathers or a "down" stuffing, so they will never have to proper 'V' shape. Boo! Maybe Cassie {Hi Sugarplum} will come over and teach me how she made all of her pillows have that perfect 'V' or as she calls it "a perfectly chopped pillow"...and how to make no-sew pillows!

Spaghetti Pie

Wednesday, September 19, 2012


Who doesn't love spaghetti and who doesn't love pie? Why not combine the two!

What you need:
  • 4oz. dried spaghetti
  • 1 Tbsp butter
  • 1 egg, beaten
  • 1/4 cup grated Parmesan cheese
  • 8oz. ground beef (we used deer!)
  • 3/4 chopped onion*
  • 1 clove garlic, minced*
  • 1 8oz. can of tomato sauce*
  • 1 tsp dried oregano*
  • 1 cup low-fat cottage cheese
  • 1/2+ cup shredded mozzarella cheese
*This is if you want to make your own spaghetti sauce. If you like the easy route like me then you can just add about 8oz. of spaghetti sauce to your browned meat (this is the way to go!). We used Prego 'Fresh Mushroom', but you can use whatever you'd like.
  1. Preheat oven to 350. Cook spaghetti according to package. Drain. Return spaghetti to warm saucepan. Stir in butter until melted, then add egg and Parmesan cheese.
  2. Meanwhile, brown meat. Add spaghetti sauce, or go the difficult route and add all the * items :)
  3. Coat a 9-inch pie plate with nonstick cooking spray. Press spaghetti/egg/cheese mixture onto the bottom and sides of the pie plate. You are making a spaghetti crust.
  4. Spread cottage cheese on the bottom and sides of the pasta crust.
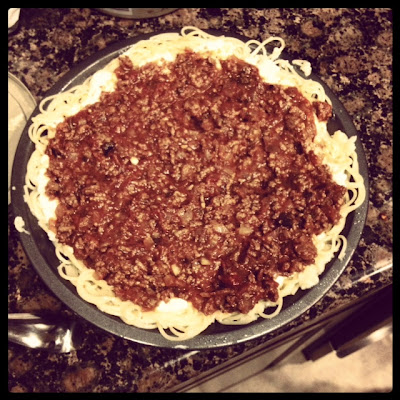
  5. Spread meat and sauce mixture over the cottage cheese (I promise you cannot taste the cottage cheese for those of you cringing right now...I hate cottage cheese, but love this recipe).
  6. Sprinkle with shredded mozzarella. 
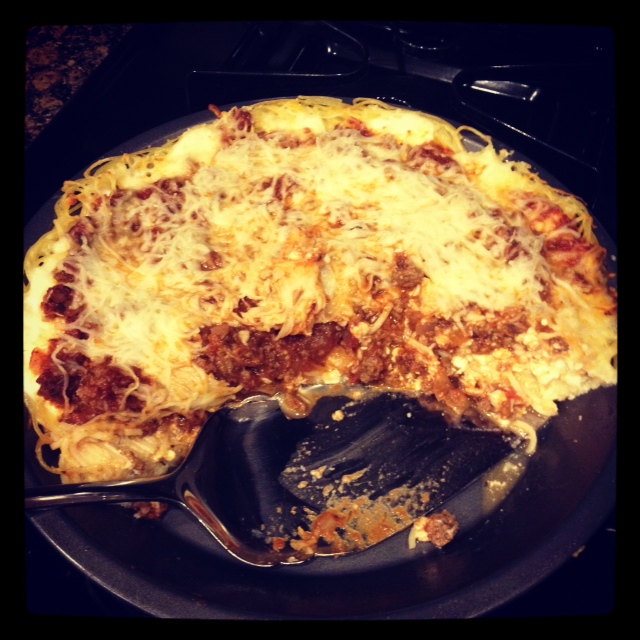
  7. Bake for 20 to 25 minutes or until bubbly and heated through. Cut into wedges just like a pie, and enjoy!


*Recipe based off of Better Homes and Gardens "Our Best Recipes"